
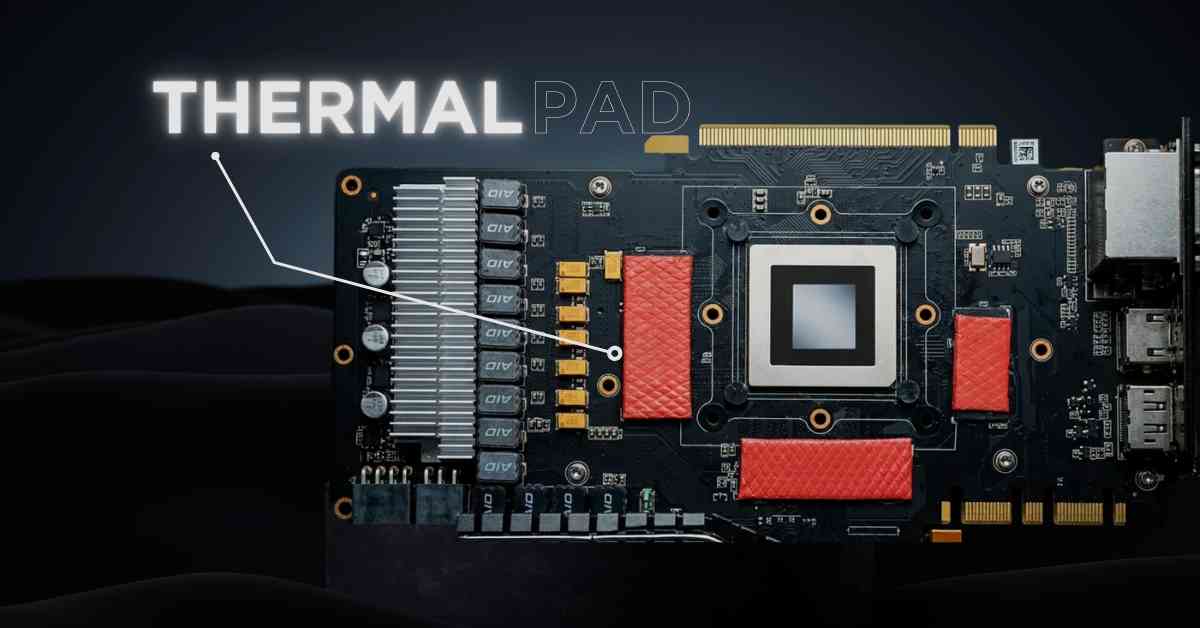
PC Thermal Pads are soft, heat-conductive interface materials designed to improve heat transfer between computer components and heat sinks. A thermal pad for pc applications fills microscopic gaps and surface irregularities between components, helping eliminate insulating air pockets and improving overall cooling efficiency. Unlike thermal paste, these pre-cut pads provide consistent thickness and cleaner installation while offering long-term stability without the mess associated with liquid compounds. They are commonly used for cooling VRMs (voltage regulator modules), GPU VRAM modules, memory chips, M.2 SSDs, and laptop components where precise gap filling is required.
Modern thermal pads are made from silicone-based or graphite-based materials infused with thermally conductive fillers such as ceramic particles, aluminum oxide, or carbon fibers. Depending on the material and application, quality thermal pads typically offer thermal conductivity ratings ranging from 3–17 W/mK, providing efficient heat transfer for gaming PCs, workstations, and high-performance computing systems. High-quality materials maintain flexibility and thermal performance across wide temperature ranges, often from -50°C to 200°C, ensuring reliable heat dissipation throughout a system’s operational lifecycle. Selecting the correct thermal pad thickness, conductivity rating, and compression level is essential for achieving optimal cooling performance and protecting sensitive computer hardware.
How Thermal Pads Work: The Science of Heat Transfer
Thermal pads function through conduction the direct transfer of thermal energy between molecules. When your processor generates heat during operation, this energy must travel through the thermal interface material to reach the heatsink or cooling solution. Air gaps between surfaces act as insulators because air has extremely poor thermal conductivity (approximately 0.024 W/mK). Thermal pads compress when clamped between components, filling microscopic valleys and peaks on both metal surfaces.
The conductive particles within thermal pads create pathways for heat to flow efficiently. Higher-quality pads contain greater concentrations of thermally conductive materials like aluminum oxide, boron nitride, or graphene. These particles form chains that conduct thermal energy while the flexible silicone or polymer base maintains constant contact pressure. The pad’s softness allows it to conform to surface imperfections without requiring perfect mounting pressure, making installation more forgiving than thermal paste applications.
Heat transfer efficiency depends on three factors: thermal conductivity of the material, contact area between surfaces, and thickness of the interface layer. Thermal pads excel in applications requiring specific gap-filling capabilities, such as VRAM chips with varying heights or components with uneven mounting surfaces.
Thermal Pads vs. Thermal Paste: Key Differences
| Feature | Thermal Paste | Thermal Pads |
|---|---|---|
| Application Method | Requires careful spreading in a very thin layer; improper application can cause air bubbles or excess paste | Pre-cut or easily cut to size; simply place and install |
| Thermal Performance | High-end pastes offer 8–14 W/mK, generally higher raw conductivity | Standard pads: 3–6 W/mK; premium pads (e.g., Gelid GP-Extreme, Thermal Grizzly Minus Pad) reach 12–15 W/mK |
| Longevity | Degrades over 2–4 years due to drying and pump-out | Maintains performance for 5–7 years with no drying |
| Reusability | Single-use; must be completely cleaned before reapplication | Often reusable 2–3 times if undamaged |
| Mess Factor | Can be messy; requires isopropyl alcohol and lint-free cloths for cleanup | No mess, no residue |
| Gap Filling Ability | Effective only in ultra-thin layers (≤0.1 mm) | Excellent for gaps 0.5–3 mm, ideal for VRAM, MOSFETs, chipsets |
| Best Use Case | CPU and GPU dies requiring maximum heat transfer | Memory modules, power delivery components, uneven surfaces |
| Cost | $5–15 per tube (multiple applications) | $8–40 depending on size, thickness, and conductivity |
Where Are Thermal Pads Used in a PC?
VRM Components: Voltage regulator modules generate significant heat during power delivery to CPUs and GPUs. Thermal pads on MOSFETs, inductors, and capacitors transfer heat to heatsinks or backplates, preventing throttling during sustained workloads.
Graphics Card VRAM: GDDR6 and GDDR6X memory chips on graphics cards run extremely hot, especially on high-performance models like RTX 4090 or RX 7900 XTX. Manufacturers place thermal pads between memory modules and the GPU backplate or dedicated heatsink structures.
M.2 NVMe SSDs: High-speed PCIe Gen4 and Gen5 NVMe drives throttle without adequate cooling. Thermal pads between the SSD controller/NAND chips and motherboard heatsinks or aftermarket coolers maintain optimal performance during file transfers.
Laptop CPUs and GPUs: Space constraints in laptops make thermal pads ideal for cooling multiple components. They’re commonly found between heat pipes and various chips, providing flexible thermal management in compact chassis.
Chipset Cooling: Motherboard chipsets (X670, Z790, B650) use thermal pads to connect to heatsinks, ensuring stable operation of PCIe lanes, USB controllers, and other I/O functions.
Memory Modules: High-performance DDR5 RAM kits include thermal pads between memory chips and integrated heat spreaders, crucial for overclocked configurations running at 6000MHz or higher.
Power Supply Components: Inside PSUs, thermal pads cool transistors, rectifiers, and capacitors, improving efficiency and extending component lifespan.
Audio and Network Chips: Dedicated sound cards and network interface cards use thin thermal pads for cooling processors and controller chips during intensive operations.
Key Properties of Quality Thermal Pads
Thermal Conductivity Rating
Thermal conductivity, measured in watts per meter-kelvin (W/mK), indicates how efficiently a material transfers heat. Entry-level thermal pads range from 3-6 W/mK, suitable for low-power components like basic VRMs or older hardware. Mid-range pads (6-10 W/mK) handle modern gaming systems, DDR5 memory, and Gen4 NVMe drives effectively.
High-performance pads (10-15 W/mK) are essential for extreme applications: overclocked CPUs, high-wattage GPUs, cryptocurrency mining rigs, and workstation-class components under constant load. Materials like graphene-infused compounds or exotic fillers like boron nitride achieve these premium ratings.
The conductivity rating directly impacts temperature reduction. Upgrading from a 6 W/mK pad to a 12 W/mK pad can reduce component temperatures by 5-15°C under load, depending on the cooling solution’s efficiency. However, conductivity alone doesn’t guarantee performance—proper thickness, compression, and contact area matter equally.
Manufacturers test thermal conductivity using ASTM D5470 standards, but real-world performance varies based on surface finish, mounting pressure, and ambient temperatures. Always verify independent reviews for actual thermal performance rather than relying solely on manufacturer specifications.
Thickness Matters: Choosing the Right Size
Thermal pad thickness typically ranges from 0.5mm to 3mm, with 1mm and 1.5mm being most common. Choosing incorrect thickness creates air gaps (too thin) or excessive compression (too thick), both reducing thermal transfer efficiency dramatically.
Measuring Gap Height: Use digital calipers or feeler gauges to measure the exact distance between the component surface and heatsink when properly mounted. For VRAM modules, measure from the chip top to the backplate inner surface. Account for any existing adhesive residue when measuring.
Compression Characteristics: Quality thermal pads compress 10-30% under mounting pressure. A 1.5mm pad compresses to approximately 1.2-1.35mm, filling microscopic surface irregularities. Select pads slightly thicker than the measured gap to ensure proper compression without excessive force.
Component-Specific Requirements: VRMs typically need 1-1.5mm pads, VRAM modules require 0.5-2mm depending on backplate design, and M.2 SSDs work best with 0.5-1mm pads. Check manufacturer specifications or community teardown guides for exact measurements.
Multiple Thickness Strategy: Some applications require different thicknesses on the same device. High-end graphics cards might use 2mm pads on VRAM, 1.5mm on VRM MOSFETs, and 1mm on capacitors—all in a single thermal solution.
Stacking Consideration: Never stack multiple thin pads to achieve desired thickness. This creates additional thermal interfaces, dramatically reducing heat transfer efficiency. Always use a single pad of appropriate thickness.
Material Composition Types
Silicone-Based Pads: The most common type, featuring silicone polymer matrices filled with aluminum oxide or ceramic particles. These pads offer good conformability, wide temperature ranges (-50°C to 200°C), and electrical insulation. Budget-friendly options for mainstream builds, typically rated 3-8 W/mK.
Graphite-Based Pads: Pure graphite or graphene-enhanced pads achieve superior conductivity (10-17 W/mK) through crystalline carbon structures. Graphite pads are stiffer and less conformable but excel in flat-surface applications like GPU backplates and SSD coolers. They’re also thinner (0.2-1mm), making them ideal for tight clearances.
Phase-Change Materials (PCM): These advanced pads remain solid at room temperature but soften around 45-60°C, conforming perfectly to surface irregularities. PTM7950, used in PS5 consoles and high-end laptops, offers paste-like performance (8.5 W/mK) with pad convenience. PCM pads work excellently on CPUs and GPUs.
Gel-Type Pads: Ultra-soft gel pads combine paste-like conformability with pad convenience. They’re extremely compressible, filling large gaps (1-3mm) while maintaining good thermal contact. Ideal for applications with uneven surfaces or multiple component heights.
Hybrid Compounds: Premium pads incorporate multiple materials—silicone base with graphene sheets, ceramic particles, and boron nitride—achieving 12-15 W/mK ratings. These represent the current performance ceiling for pad technology.
Electrically Conductive Pads: While most thermal pads insulate electrically, specialized conductive pads exist for grounding applications or specific industrial uses. Avoid these in standard PC builds to prevent short circuits.
Hardness/Softness (Shore Hardness)
Shore hardness measures material firmness using scales 00 (softest) to D (hardest). Thermal pads typically range from Shore 00-40 (very soft) to Shore A-60 (firm). This property dramatically affects installation and performance.
Soft Pads (Shore 00-30): Extremely conformable, filling surface irregularities with minimal mounting pressure. Ideal for components with varying heights, delicate substrates, or low-pressure mounting systems. Risk tearing during installation or removal.
Medium Pads (Shore 00-50 to A-40): Balanced conformability and structural integrity. These pads compress adequately while maintaining shape during installation. Best for general PC applications including VRMs, VRAM, and most cooling scenarios.
Firm Pads (Shore A-45 to A-60): Graphite-based and high-performance pads fall into this category. They require proper mounting pressure to achieve optimal contact but resist tearing and maintain dimensional stability. Suited for flat surfaces with consistent gap heights.
Application Impact: Softer pads work with lower mounting torque specifications, reducing risk of component damage. Firmer pads demand precise gap measurements and adequate clamping force—insufficient pressure leaves air gaps, while excessive force can crack components.
Temperature Effects: Pad hardness changes with temperature. Most pads soften slightly when heated, improving conformability during operation. Quality pads maintain consistent hardness across their rated temperature range, preventing pump-out or excessive cold-state stiffness.
When to Replace Thermal Pads: Signs & Symptoms
Temperature Increases: Gradual or sudden temperature spikes indicate thermal pad degradation. If your GPU VRAM exceeds 95°C when it previously ran at 80°C, or CPU VRM temperatures climb 15°C+ above baseline, pad replacement is necessary. Monitor temperatures using HWiNFO64, GPU-Z, or manufacturer software.
Thermal Throttling: Performance drops during sustained workloads signal overheating. CPUs reducing clock speeds, GPUs downclocking, or NVMe SSDs slowing file transfers all indicate inadequate thermal transfer. Check temperature logs during throttling events to identify affected components.
Physical Degradation: Remove heatsinks during maintenance to inspect pads visually. Look for hardening (pads become brittle or crack), oil separation (silicone oils leaking onto components), tearing, or compression set (pads permanently compressed, losing gap-filling ability). Discoloration from pink/gray to brown/black indicates heat damage.
Component Age: Even without visible degradation, replace thermal pads every 4-5 years as preventive maintenance. Budget pads degrade faster; premium pads last 6-8 years. Laptops and SFF systems with higher ambient temperatures require more frequent replacement.
After Disassembly: Thermal pads lose effectiveness after removal. While premium pads tolerate 2-3 reinstallations, standard pads should be replaced whenever heatsinks are removed for cleaning, upgrades, or troubleshooting.
Dust Accumulation: Heavy dust buildup on heatsink fins increases thermal resistance, stressing thermal pads beyond design limits. If cleaning doesn’t restore normal temperatures, underlying pad degradation is likely.
Liquid Metal Contact: If liquid metal thermal paste accidentally contacts thermal pads, immediate replacement is mandatory. Liquid metal corrodes and destroys standard thermal pad materials.
Manufacturing Issues: Some graphics cards and laptops ship with inadequate thermal pads. Research your specific model—community forums often identify problematic devices. RTX 3080/3090 cards, certain ASUS laptops, and budget motherboards are known culprits requiring immediate pad replacement.
How to Choose the Right Thermal Pad: A Buying Guide
By Component Type
GPU VRAM Thermal Pads: Select high-conductivity pads (8-12 W/mK minimum) rated for continuous operation above 100°C. GDDR6X memory reaches 110°C under load, demanding premium materials. Thickness requirements vary by card model—check manufacturer specifications or teardown guides. Popular choices: Gelid GP-Extreme (12 W/mK), Thermalright Odyssey (12.8 W/mK), Thermal Grizzly Minus Pad 8 (8 W/mK).
CPU VRM Thermal Pads: VRM MOSFETs benefit from 6-10 W/mK pads, with softer durometer for uneven component heights. Thickness typically ranges 1-2mm depending on heatsink design. Budget-conscious builders can use mid-range pads here without significant performance loss. Options: Arctic Thermal Pad (6 W/mK), Gelid GP-Ultimate (15 W/mK for extreme overclocking).
M.2 NVMe SSD Thermal Pads: Thin pads (0.5-1mm) with moderate conductivity (5-8 W/mK) suit most SSDs. Gen5 drives generating 14W+ heat require premium 10+ W/mK pads. Ensure electrical insulation to prevent shorts on exposed controller contacts. Recommended: Thermalright Thermal Pad (6.2 W/mK), IC Graphite Thermal Pad (35 W/mK for extreme performance).
Laptop Components: Space constraints and low mounting pressure require soft, conformable pads (Shore 00-40). Conductivity matters less than gap-filling ability in cramped laptop chassis. Thickness varies dramatically—measure carefully. Consider: Fujipoly Ultra Extreme (17 W/mK, expensive but worthwhile), Thermal Grizzly Carbonaut (62.5 W/mK graphite pad).
RAM Heat Spreaders: Standard 5-6 W/mK pads suffice for DDR4. Overclocked DDR5 (6400MHz+) benefits from 8-10 W/mK pads between chips and heat spreaders. Thickness usually 0.5-1mm.
Power Supply Components: Industrial-grade pads rated for 150°C+ continuous operation. Conductivity 3-6 W/mK adequate for PSU rectifiers and capacitors. Focus on longevity over performance.
Performance vs. Price Considerations
Budget Tier ($8-15): Generic 3-6 W/mK silicone pads from ARCTIC, Cosmos, or TronXY. Adequate for older hardware, light-duty systems, or non-critical components. Expect 2-4 year lifespan. Best for: office PCs, media servers, legacy hardware upgrades.
Mainstream Tier ($15-25): 6-10 W/mK pads from Gelid Solutions, Thermalright, or Thermal Grizzly. Reliable performance for gaming PCs, workstations, and enthusiast builds. 4-6 year lifespan with stable performance. Sweet spot for value-conscious builders prioritizing long-term reliability.
Premium Tier ($25-45): 10-15 W/mK pads using advanced materials—graphene, boron nitride, or phase-change compounds. Fujipoly Ultra Extreme, Thermal Grizzly Carbonaut, IC Graphite, PTM7950. Justify the cost in: mining rigs, overclocked systems, high-wattage GPUs (RTX 4090/4080), workstation components under 24/7 load.
Exotic Tier ($50+): Specialized pads like Panasonic PGS graphite sheets or custom-cut industrial thermal solutions. Only worthwhile for competitive overclocking, extreme temperature environments, or specific industrial applications.
Cost-Benefit Analysis: Upgrading from 6 W/mK to 12 W/mK pads reduces temperatures 8-15°C typically. Calculate whether $20 extra investment prevents component replacement or extends hardware lifespan sufficiently. For $1500+ GPUs, premium pads are insurance against thermal damage and throttling.
Bulk Purchasing: Large sheets (200x200mm) offer better value than pre-cut pads. Buy in bulk if building multiple systems or maintaining a fleet of computers.
Regional Availability: Import costs dramatically affect pricing. Check local suppliers for Gelid and Thermalright before ordering premium Japanese brands with expensive shipping.
Step-by-Step: How to Install Thermal Pads Correctly
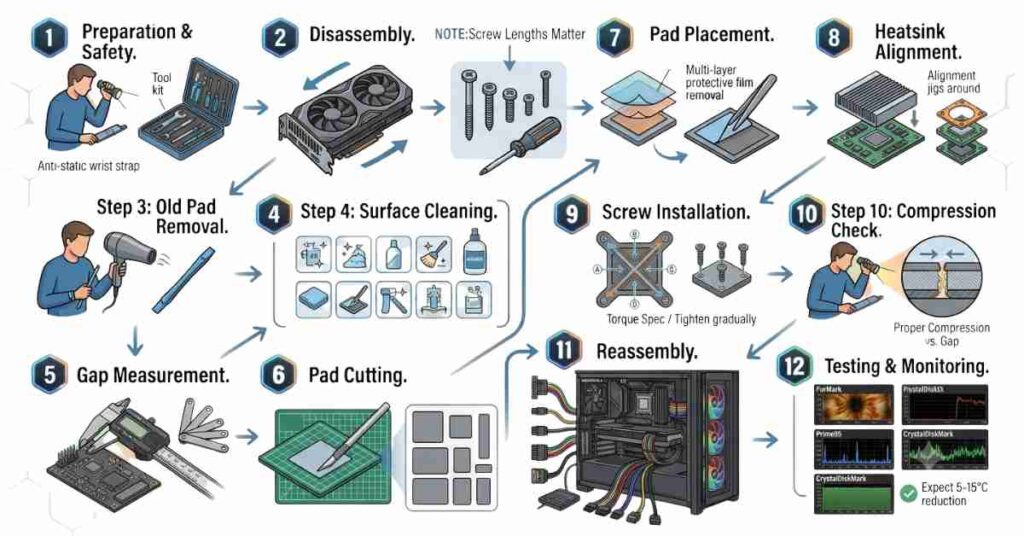
Step 1 – Preparation and Safety:
Power down your PC completely and disconnect from wall power. Discharge static electricity using an anti-static wrist strap or by touching unpainted metal chassis regularly. Gather tools: Phillips screwdrivers, plastic spudgers, isopropyl alcohol (90%+ concentration), lint-free microfiber cloths, digital calipers, and your thermal pads.
Step 2 – Disassembly:
Remove the component requiring thermal pad replacement. For graphics cards, unscrew the backplate and cooler shroud carefully, noting screw locations (different lengths often used). Disconnect fan cables and RGB connectors. For motherboard VRMs, remove the heatsink assembly, photographing cable routing for reassembly reference.
Step 3 – Old Pad Removal:
Gently peel away old thermal pads using plastic spudgers or fingernails. Avoid metal tools that scratch component surfaces. Some pads adhere strongly—apply gentle heat using a hair dryer (low setting) to soften adhesive. Never force removal; patience prevents component damage.
Step 4 – Surface Cleaning:
Apply isopropyl alcohol to microfiber cloths and thoroughly clean all surfaces where thermal pads contact. Remove adhesive residue, dust, and oil completely. Clean both component surfaces (VRAM chips, MOSFETs) and heatsink contact areas. Allow surfaces to air-dry completely—any alcohol residue evaporates within 60 seconds.
Step 5 – Gap Measurement:
Using digital calipers or feeler gauges, measure the exact distance between component top surfaces and heatsink when properly seated. Measure multiple points if components have varying heights. Add 0.1-0.3mm to account for compression. Write down measurements for each location.
Step 6 – Pad Cutting:
Place thermal pads on a clean cutting mat. Use a sharp hobby knife or scissors to cut pads matching component dimensions. Cut slightly larger than the component—excess overhangs get compressed harmlessly. For multiple components, cut all pads before installation to streamline the process.
Step 7 – Pad Placement:
Remove one protective film layer from the thermal pad. Place pad adhesive-side down onto the component, centering carefully. Press gently to ensure contact without excessive compression. Remove the top protective film. Repeat for all locations, working systematically to avoid confusion.
Step 8 – Heatsink Alignment:
Position the heatsink or backplate above the components, aligning screw holes perfectly. Lower slowly to contact thermal pads simultaneously. Misalignment causes pads to shift, creating gaps. Consider using alignment jigs or having an assistant guide larger assemblies.
Step 9 – Screw Installation:
Install screws in a cross-pattern (opposite corners), tightening gradually in multiple passes. Never fully tighten one screw before starting others—this creates uneven pressure distribution and air gaps. Use manufacturer-specified torque settings if available, or tighten until resistance increases noticeably, then add 1/4 turn.
Step 10 – Compression Check:
After initial tightening, verify that thermal pads are evenly compressed. Look for bulging pad material around component edges (slight bulging is normal; excessive indicates too-thick pads). Inspect for gaps between heatsinks and components—use a flashlight to spot daylight showing through.
Step 11 – Reassembly:
Reconnect fan cables, RGB headers, and power connectors. Replace any protective plastic films or stickers removed during disassembly. Double-check all connections before proceeding.
Step 12 – Testing and Monitoring:
Power on the system and immediately launch temperature monitoring software. Run stress tests appropriate for components: FurMark for GPUs, Prime95 for CPUs, CrystalDiskMark for NVMe drives. Compare temperatures against previous baselines. Expect 5-15°C reductions with quality pad replacements. Monitor for 24 hours to ensure stability.
Troubleshooting: If temperatures increase or match previous readings, disassemble and verify: correct pad thickness, complete protective film removal, adequate compression, proper surface cleaning, and pad alignment. One improperly installed pad can negate the entire upgrade.
Common Thermal Pad Myths Debunked
| Myth | Reality |
|---|---|
| Thicker Pads Always Perform Better | Excessive thickness reduces thermal transfer efficiency. Thicker materials create longer heat travel distances, and over-compressed pads lose conformability. Always match pad thickness to the actual gap measurement plus 10–20% compression allowance. |
| Thermal Paste Is Always Superior to Pads | Paste outperforms pads in CPU direct-die applications where gaps are minimal (0.05–0.1mm). However, pads excel in applications requiring gap-filling (0.5mm+), consistency across multiple components, and long-term stability. Modern premium pads (12+ W/mK) rival paste performance in many scenarios. |
| All Thermal Pads Degrade Quickly | Budget pads using low-grade silicone compounds can degrade within 2–3 years. Quality pads from Fujipoly, Gelid Solutions, or Thermal Grizzly maintain performance for 6–8 years without hardening or oil separation. Material quality, not the pad format itself, determines longevity. |
| Higher W/mK Rating Guarantees Better Cooling | Thermal conductivity is only one factor. A 15 W/mK pad that is too thin and leaves air gaps can perform worse than a properly fitted 8 W/mK pad. Consider thickness accuracy, compression characteristics, and contact area alongside conductivity ratings. |
| You Can Stack Multiple Thin Pads | Each thermal interface adds resistance. Stacking two 0.5mm pads creates two thermal boundaries instead of one, dramatically reducing heat transfer. Always use a single pad of appropriate thickness rather than stacking multiple thinner pads. |
| Thermal Pads Don’t Need Replacement | All thermal interface materials degrade over time due to thermal cycling, UV exposure, and chemical breakdown. Even visually intact pads can experience microscopic changes that reduce performance. Replace pads during major maintenance (every 4–5 years minimum). |
| Cheaper Pads Work Just As Well | Budget pads use lower concentrations of conductive fillers, resulting in worse thermal transfer. They also harden faster, tear more easily, and may contain oils that leak onto components. Premium pads justify higher costs through improved performance and longevity. |
| Thermal Pads Conduct Electricity | Most thermal pads are electrically insulating, using ceramic or non-conductive fillers. Specialized electrically conductive pads exist but are clearly labeled for specific industrial applications. Standard PC thermal pads help prevent short circuits while transferring heat. |
| Installation Order Doesn’t Matter | Installing pads on hot components first (such as VRAM) prevents heat from transferring to cooler components during installation. Working systematically also prevents missed locations. Always follow manufacturer teardown sequences when available. |
| More Mounting Pressure Improves Performance | Excessive pressure can crack components, crush pads beyond their effective compression range, and bow PCBs. Follow manufacturer torque specifications. Proper mounting uses enough pressure to compress pads by 20–30%, not maximum tightness. |
Conclusion
Thermal pads serve as critical thermal interface materials in modern PCs, bridging gaps between heat-generating components and cooling solutions. Understanding thermal conductivity ratings, proper thickness selection, and material composition empowers you to make informed decisions for your specific hardware configuration. Quality thermal pads prevent throttling, extend component lifespan, and maintain system stability under demanding workloads. Whether upgrading GPU VRAM cooling, refreshing laptop thermals, or building a new system, selecting appropriate thermal pads based on component requirements rather than marketing claims ensures optimal thermal management. Premium thermal pad manufacturers such as Thermal Grizzly and Fujipoly are known for producing high-quality thermal interface materials for demanding applications. For GPU upgrades, checking your graphics card specifications helps determine the correct thermal pad thickness and performance requirements. Regular maintenance, including pad inspection and timely replacement, keeps your system running efficiently for years. The investment in premium thermal pads is typically $20 40 is minimal compared to potential hardware damage from overheating or performance loss caused by thermal throttling.
Frequently Asked Questions (FAQ)
How long do thermal pads last before needing replacement?
Quality thermal pads last 4-6 years under normal use, while premium pads can maintain effectiveness for 6-8 years. Budget pads may degrade within 2-3 years. Lifespan depends on operating temperatures, thermal cycling frequency, and material quality. Replace pads immediately if you notice temperature increases, throttling, or physical degradation during maintenance inspections.
Can thermal pads replace thermal paste on CPUs?
Standard thermal pads shouldn’t replace paste on desktop CPUs due to larger gap requirements and lower conductivity. However, phase-change materials (PTM7950) offer paste-like performance with pad convenience, suitable for laptop CPUs or specific applications. Desktop CPUs benefit most from high-quality thermal paste due to minimal IHS-to-cooler gaps (0.05-0.1mm) where paste excels.
What thermal pad thickness should I use for GPU VRAM?
GPU VRAM thermal pad thickness varies by model—typically 1-2mm for most graphics cards. Measure the exact gap between VRAM chip tops and backplate/heatsink contact surface using digital calipers. Check manufacturer specifications, community teardown guides, or forums dedicated to your specific GPU model. Using incorrect thickness creates air gaps (too thin) or excessive compression (too thick), both reducing cooling effectiveness.
Are expensive thermal pads worth the extra cost?
For high-performance systems, yes. Premium pads (10-15 W/mK) reduce temperatures 8-15°C compared to budget options, preventing throttling on overclocked GPUs, mining rigs, and workstations under sustained load. For office PCs or light-duty systems, mid-range pads (6-8 W/mK) provide adequate performance at lower cost. Calculate value based on your hardware investment and thermal requirements.
How do I know if my thermal pads need replacing?
Monitor temperature trends using HWiNFO64 or GPU-Z. Warning signs include: gradual temperature increases (10-15°C+ above baseline), thermal throttling during workloads, performance drops, visual degradation (hardening, discoloration, oil leakage), or reaching 4-5 years since last replacement.
Where can I buy thermal paste near me?
Thermal paste is available from local computer stores and online retailers such as Amazon, which ships PC cooling products throughout the USA.
